Android Food Labeling App Tutorial
Overview
My platform focus topic for my semester project in CIS 357 is TensorFlow for Android. TensorFlow is an open-source library for machine learning and artificial intelligence. TensorFlow Lite, or TF Lite, provides APIs for Mobile Apps to use TensorFlow models. The models are optimized to be more efficient on devices like mobile phones.
TensorFlow models are mainly used for use cases such as voice/speech rocognition, text recognition, image recognition, and more. Developers have the ability to create their own machine learning and AI models without getting into all of the nitty-gritty details. Developers can spend more time focusing on the actual logic of their model and TensorFlow will take care of the details behind the scenes. TensorFlow offers many pre-trained models that other developers can implement into their project. This is the case with my mobile application.
TensorFlow Lite converts pre-trained models into a special format that optimizes speed and storage. That is why it is especially useful on smaller capacity devices such as mobile phones or embedded devices like Raspberry Pi.
For my project I have created a mobile app that allows Android users to take a picture or select a photo from their gallery of a food dish and the app will identify what the dish is. It will give three different options ranked by the probability of what the dish is. The user will also be able to see what these probabilities are. The TF Lite model I used was a food classification model published by Google. A link to the model can be found here. Other ready-to-deploy models can be found at this link.
The model I have chosen to implement into my app has the ability to recognize 2023 different food dishes. It is not able to decide whether or not something is edible or specify ingredients within a dish. If the input image is not of a food dish, or the image is not properly cropped, the output from the model may have no meaning. Google has also noted that the model was trained with a dataset skewed towards North American foods.
In the image below you can see an example of the application classifying the default image, a cheese burger.
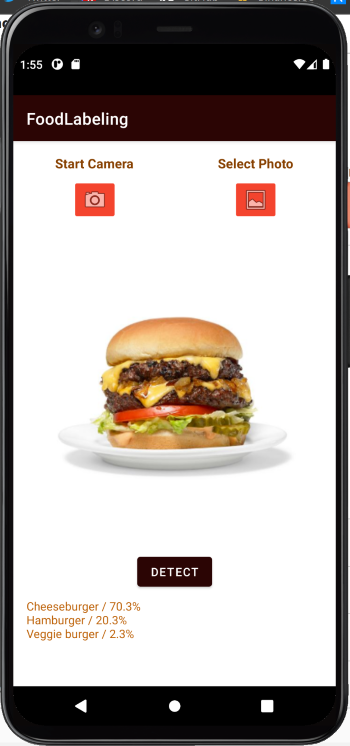
The Android user can click the camera or gallery button to use their own images as input. After they have their desired image, they press detect to get the output and identify their food dish. An example of a real world use case of this app may be if someone was given the opportunity to try some new desserts but they are not sure exactly what dish they are eating. They could take a picture of their food and the app may be able to help them with this identification. These are some of the basics regarding TensorFlow and my app. The next section will provide you with the tools needed to get started in creating the app.
Getting Started
To create this project you will need to download Android Studio and the TF Lite model I used in the project.
I am using Android Studio Artctic Fox 2020.3.1. Click here to download Android Studio
To download the TF Lite model click here
Setting Up Android Studio
Before the tutorial on how to create the project, it is important to set up Android Studio properly.
- First, create a new project in Android Studio. Select Empty Activity and press next.
- Name the project and select where you would like save your project. Make sure your language is Kotlin. Set your minimum SDK to API 23: Android 6.0 (Marshmallow). Press Finish.
- We will now import our TF Lite model. Go to File-New-Other-TensorFlow Lite Model. Put in where your TF Lite model is located. Press Finish. The required dependencies will automatically be imported.
- Next, we will need a default image that will appear when the application open. For my app I used this image of a cheeseburger. However, your image does not matter as long as it is of a single food dish. Android Studio seems to prefer PNG files, so I converted the image to a PNG.
- On the far left in Android Studio, select the Resource Manager. Press + and then Import Drawables. Find your image and then press Next. Then, press Import.
Now, Android Studio should be all set up in order to create the Food Labeling Application. The following section will be a step-by-step coding tutorial that can be used to create it yourself.
Step-By-Step Instructions
UI
- The first thing we will do is set up the UI for the application. In activity_main.xml, clear any constraints and widgets within the file. We will add a vertical guideline set in the middle of the screen. Then, we will place a textView that is centered between the guideline (to the left of the guideline) and the parent view with a 16dp contraint to the top of the parent view. Make the text within this textview say Start Camera. Put another textView on the right of the guideline with the same constraints. Make the text in this textView say Select Photo.
- Now, we will put two ImageButtons below each of these textViews. For the left ImageButton, find clipart for a camera to put inside of it. Set the id of the ImageButton to be cameraButton. Make sure it is centered betweent he guideline and parent view and set a top constraint of 8dp to the textView above. On the right side of the guideline, make sure the ImageButton has clipart for ‘gallery’ within it. This will have the same constraints as the other ImageButton.
- Now place an ImageView with the picture of your chosen food that is located in res-drawable folder. This ImageView will have a constraint of 8dp on its left and right side to the edge of the parent view. There will also be a constraint of 8dp on the top to one of the ImageButtons. Set the layout_width to match_parent and the layout_height to 0dp. Set the id to imageView.
- At the very bottom of the parent view put another TextView with the id resultsTextView. Create a constraint 16dp to the bottom of the parent from the bottom of the TextView. Place a contraint of 8dp from the left and right of the TextView to the edges of the parent. Set its layout_width to 0dp and its layout_height to 100dp. Make sure there is no text within the TextView.
- Now, right above the resultsTextView, place a Button. Set the id to detectButton and the text within it to say Detect. Center it within the parent and set a constraint from the bottom to the top of resultsTextView of 8dp. Then, click on imageView and create a constraint from the bottom of it to the top of detectButton that is 8dp.
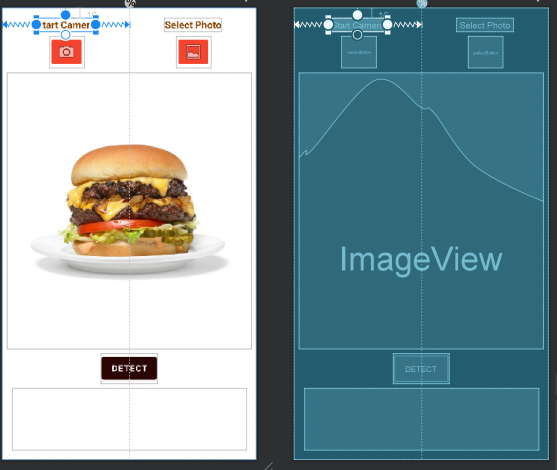
If you followed the instructions, your layout should look somewhat like this:
Adding Functionality
- We will now add some functionality to the app. In MainActivity add
private var image: ImageView? = nullto the global variables. Within the onCreate function addval camera = findViewById<ImageButton>(R.id.cameraButton) val gallery = findViewById<ImageButton>(R.id.galleryButton) image = findViewById<ImageView>(R.id.imageView) val detect = findViewById<Button>(R.id.detectButton) val results = findViewById<TextView>(R.id.resultsTextView) - Also within onCreate add
camera.setOnClickListener{},gallery.setOnClickListener{}, anddetect.setOnClickListener{}. This will allow us to define what happens when one of our buttons are pressed.
Permissions and Intents
- Before we continue we msut specify our app requires certain permissions and uses certain hardware. Since our app will be using the user’s camera and accessing their photo gallery, we must ask for permissions to do these actions. To start we must add the following to AndroidManifest.xml:
<uses-permission android:name="android.permission.CAMERA" /> <uses-permission android:name="android.permission.READ_EXTERNAL_STORAGE" /> <uses-feature android:name="android.hardware.camera" android:required="false" /> - In MainActivity add the following to the top of the class:
 companion object{
     private const val CAMERA_RESULT = 1
     private const val GALLERY_RESULT = 2
     private const val MY_CAMERA_PERMISSION_CODE = 100
     private const val MY_GALLERY_PERMISSION_CODE = 200
 }
These will be the request codes for the four things we could possibly do in the app. They are send an intent to take a picture, send an intent to open the gallery and select a picture, request permission to use the camera, and request permission to access the user’s photos.
- Now in our
camera.setOnClickListeneradd the following:if(ContextCompat.checkSelfPermission(this, Manifest.permission.CAMERA) != PackageManager.PERMISSION_GRANTED){ requestPermissions(arrayOf(Manifest.permission.CAMERA), MY_CAMERA_PERMISSION_CODE) } else{ val cameraIntent = Intent(MediaStore.ACTION_IMAGE_CAPTURE) startActivityForResult(cameraIntent, MainActivity.CAMERA_RESULT) }This will first check if we have permission to access the camera. If the user has not granted permission, a request for permission will be sent. If permission was already granted, an intent to take a picture and return the result will begin. We will do something similar in
gallery.setOnClickListener. Add the following code in order to check for permission, and if we already have permission, start an intent to return with an image from their photo gallery:if(ContextCompat.checkSelfPermission(this, Manifest.permission.READ_EXTERNAL_STORAGE) != PackageManager.PERMISSION_GRANTED){ requestPermissions(arrayOf(Manifest.permission.READ_EXTERNAL_STORAGE), MY_GALLERY_PERMISSION_CODE) } else{ val galleryIntent = Intent(Intent.ACTION_PICK) galleryIntent.type = "image/*" startActivityForResult(galleryIntent, MainActivity.GALLERY_RESULT) } - Now we must handle what happens when the user gives or denies permission to use the camera/gallery. Create the following function:
override fun onRequestPermissionsResult(requestCode: Int, permissions: Array<out String>, grantResults: IntArray) { super.onRequestPermissionsResult(requestCode, permissions, grantResults) } - Within this function we must handle the cases when we return from requesting permission for the camera or gallery. Add the following code to the function:
 when(requestCode){
     MY_CAMERA_PERMISSION_CODE -> {
         if ((grantResults.isNotEmpty() &&
                     grantResults[0] == PackageManager.PERMISSION_GRANTED)) {
             Toast.makeText(this, "Camera Permission Granted", Toast.LENGTH_LONG).show()
             val cameraIntent = Intent(MediaStore.ACTION_IMAGE_CAPTURE)
             startActivityForResult(cameraIntent, MainActivity.CAMERA_RESULT)
         }
         else {
             Toast.makeText(this, "Camera Permission Denied", Toast.LENGTH_LONG).show()
         }
         return
     }

     MY_GALLERY_PERMISSION_CODE -> {
         if ((grantResults.isNotEmpty() &&
                     grantResults[0] == PackageManager.PERMISSION_GRANTED)) {
             Toast.makeText(this, "Gallery Permission Granted", Toast.LENGTH_LONG).show()
             val galleryIntent = Intent(Intent.ACTION_PICK)
             galleryIntent.type = "image/*"
             startActivityForResult(galleryIntent, MainActivity.GALLERY_RESULT)
         }
         else {
             Toast.makeText(this, "Gallery Permission Denied", Toast.LENGTH_LONG).show()
         }
     }

     else -> {

     }
 }
This code will start the proper intent when the user grants permission for a particular case, and if the user denies permission to access the camera or gallery, will display a message confirming this with the user. Now that we are able to get permission from the user and start intents to do certain activities, we must handle what happens when we return from these activities.
Returning From Intent
- The first thing we must do is introduce four new global variables. Put the following variables at the top of the class:
 private lateinit var bitmap: Bitmap
 private var height = 350
 private var width = 350
 private var threshold = 350
bitmap will hold the image that we are trying to detect within our application. A Bitmap splits an image into a coordinate system of pixels. bitmap will always hold the image we are working with. height, width, and threshold will hold the height, width, and the largest those two values of the ImageView, respectively.
- The height and width of the ImageView will vary by screen size, so to determine the actual height and width add the following function:
override fun onWindowFocusChanged(hasFocus: Boolean) { super.onWindowFocusChanged(hasFocus) height = image!!.height width = image!!.width if(height >= width){ threshold = height } else{ threshold = width } } - To define what happens when we return from our intents add the following code:
 override fun onActivityResult(requestCode: Int, resultCode: Int, data: Intent?) {
     super.onActivityResult(requestCode, resultCode, data)
     val results = findViewById<TextView>(R.id.resultsTextView)

     if(requestCode == CAMERA_RESULT){
         if(resultCode == Activity.RESULT_OK && data !== null) {
             results.text = ""
             bitmap = data.extras!!.get("data") as Bitmap
             bitmap = getScaledDownBitmap(bitmap, threshold, true)!!
             image!!.setImageBitmap(bitmap)
         }
     }
     else if(requestCode == GALLERY_RESULT && data != null){
         results.text = ""
         val uri = data.data

         try {
             bitmap = MediaStore.Images.Media.getBitmap(this.contentResolver, uri)
             bitmap = getScaledDownBitmap(bitmap, height, true)!!
             image!!.setImageBitmap(bitmap)
         }catch (e: IOException){
             e.printStackTrace()
         }


     }
 }
This function defines what will happen when we return from the camera intent and gallery intent. When we return from the gallery intent it sets bitmap equal to the image the user took with their camera. The bitmap is then scaled down to fit the ImageView and is then the image on the ImageView is set to the proper image that was returned. When we return from the gallery intent we get the URI of the selected image that was returned. The URI is used to identify the resource that was selected (in this case a photo). Then, a bitmap is created from this URI and scaled down. The ImageView is then set to the selected photo returned from the intent.
- Now we must add the getScaledDownBitmap function. Add the following function:
 private fun getScaledDownBitmap(
     bitmap: Bitmap,
     threshold: Int,
     isNecessaryToKeepOrig: Boolean,
 ): Bitmap? {
     val width = bitmap.width
     val height = bitmap.height
     var newWidth = width
     var newHeight = height
     if (width > height && width > threshold) {
         newWidth = threshold
         newHeight = (height * newWidth.toFloat() / width).toInt()
     }
     if (width in (height + 1)..threshold) {
         //the bitmap is already smaller than our required dimension, no need to resize it
         return bitmap
     }
     if (width < height && height > threshold) {
         newHeight = threshold
         newWidth = (width * newHeight.toFloat() / height).toInt()
     }
     if (height in (width + 1)..threshold) {
         //the bitmap is already smaller than our required dimension, no need to resize it
         return bitmap
     }
     if (width == height && width > threshold) {
         newWidth = threshold
         newHeight = newWidth
     }
     return if (width == height && width <= threshold) {
         //the bitmap is already smaller than our required dimension, no need to resize it
         bitmap
     } else getResizedBitmap(bitmap, newWidth, newHeight, isNecessaryToKeepOrig)
 }
What this function does is determine what the new height and new width of the bitmap should be to fit the ImageView. It considers multiple cases to determine how to best keep the aspect ratio of the image.
- In getScaledDown we called getResizedBitmap. Add the following function:
 private fun getResizedBitmap(
     bm: Bitmap,
     newWidth: Int,
     newHeight: Int,
     isNecessaryToKeepOrig: Boolean,
 ): Bitmap? {
     val widthBitmap = bm.width
     val heightBitmap = bm.height
     val scaleWidth = newWidth.toFloat() / widthBitmap
     val scaleHeight = newHeight.toFloat() / heightBitmap
     // CREATE A MATRIX FOR THE MANIPULATION
     val matrix = Matrix()
     // RESIZE THE BIT MAP
     matrix.postScale(scaleWidth, scaleHeight)

     // "RECREATE" THE NEW BITMAP
     val resizedBitmap = Bitmap.createBitmap(bm, 0, 0, widthBitmap, heightBitmap, matrix, true)
     if (!isNecessaryToKeepOrig) {
         bm.recycle()
     }
     return resizedBitmap
 }
This function takes the new height and new width of the bitmap and scales the bitmap down to the proper size. This resized bitmap is then returned. We now have handled what happens when we return from the two different intents. The app should now allow the user to take a picture and see it within the app upon return. They should also be able to select a photo from their gallery and see it in the app upon return. Now, it is time to add the code that will allow us to use the TensorFlow Lite model to detect and classify the images.
Detecting The Images
- The first thing we will do is create a data class called Recognition. This class will have the following code:
 data class Recognition(val label:String, val confidence:Float)  {
     override fun toString(): String {
         return "$label / $probabilityString"
     }

     private val probabilityString = String.format("%.1f%%", confidence * 100.0f)
 }
This class will hold the labels for the output from the TF Lite model and the probability that the image is the given item. The confidence that the particular item in the class is the image will be given as a percentage. We will be able to present this output as a string on resultsTextView.
- We will now create a new Kotlin class with a primary constructor that contains
private val context: Context. The class should look like the following:class Detector(private val context: Context) { } - Within this class we will have one single function called recognizeImage that takes a bitmap as a parameter and returns a MutableList of our Recognition data class. insert the following function:
fun recognizeImage(bitmap: Bitmap): MutableList<Recognition> {}. - Within our function we must have a variable that will hold the output we wish to display to the user when they try to detect an image. Insert the following variable to the function:
val items = mutableListOf<Recognition>(). - Next, we need a variable that will hold our TensorFlow Lite model. Insert the following variable:
val model = LiteModelAiyVisionClassifierFoodV11.newInstance(context). This will initialize our model. - Now, we need to convert out bitmap into something that the TensorFlow Lite interpreter can analyze. Insert the following variable to the function:
val image = TensorImage.fromBitmap(bitmap). This will convert our bitmap into a TensorImage object. - Now that we have our model and TensorImage object, we can process the image and get output to classify the image. Insert the following code into the function:
 val outputs = model.process(image).probabilityAsCategoryList.apply {
     sortByDescending { it.score }
 }.take(3)
This uses our model to process our image. When you downloaded the TF Lite model, it contained metadata and associated files within it. One of these files would be probability-labels.txt. This file contains all of the possible food dishes that the model can output. When we process our image, probabilityAsCategoryList returns the labels and their probability in regard to the image. Then, the probabilities are sorted in descending order and we take the top 3 probabilities (the top 3 food dishes the image most likely is).
- Next, for the 3 items in our output list, we will add the label and score (or probability) into our list of Recognition class objects. To do so add the following code to the function:
 for (output in outputs) {
     items.add(Recognition(output.label, output.score))
 }
We will now have the top 3 outputs from the model in a list that can be presented to our user in the application.
- There are two final things we must do in our function. First we will close our model in order to release the resources we are no longer using. Add the following code to the function:
model.close(). Then, we will return our list of Recognition objects. Addreturn items. - We now will return to MainActivity to add the finishing touches. First, in the global variables of the class add the following:
private lateinit var detector: Detector. - Near the top of the onCreate function add
detector = Detector(this)as follows:override fun onCreate(savedInstanceState: Bundle?) { super.onCreate(savedInstanceState) setContentView(R.layout.activity_main) detector = Detector(this) ... - Add the following code to detect.setOnClickListener:
detect.setOnClickListener {
    val result = detector.recognizeImage(bitmap)
    results.text = ""
    for (i in result){
        results.text = (results.text as String).plus(i.toString().plus("\n"))
    }

}
This will store what is returned from the Detector class in the variable result. Then, it will loop through our 3 Recognition objects and put each as a string in our resultsTextView.
- Finally, to see if we have gotten everything working correctly we must add one last bit of code. In the onCreate function add the following code under where you created all of the variables that used findViewById to reference all of your views in the activity_main.xml file:
bitmap = BitmapFactory.decodeResource(resources, R.drawable.burger)
bitmap = getScaledDownBitmap(bitmap, threshold, true)!!
image!!.setImageBitmap(bitmap)
NOTE: In the line that says
bitmap = BitmapFactory.decodeResource(resources, R.drawable.burger), I referenced R.drawable.burger. This is the name of the PNG file I added to the drawable folder in the beginning of the project. The name of this file may be different for you. Adjust accordingly.
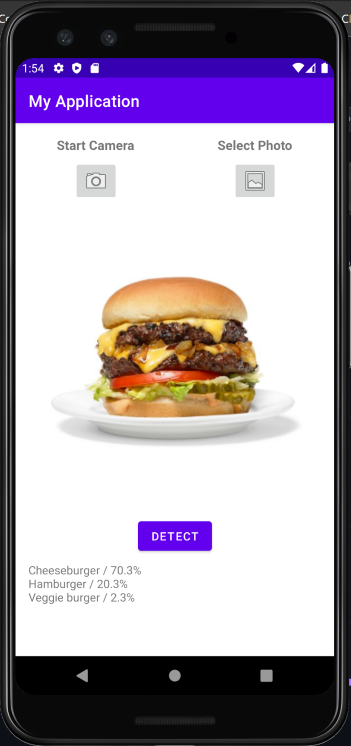
Now we will be able to test if our application is working correctly. Fire up your application, and to test if we integrated the TF Lite model properly, press the Detect button. You should now see that the model has attempted to identify what your default image was. As we can see in the following image, my application correctly identified my default image as Cheeseburger with 70.3% probability.
Further Discussion/Conclusions
Throughout this tutorial you have learned how to create an Android application that uses a TensorFlow Lite model to identify various food dishes. Along with using the TensorFlow Lite Android Support Library, you gained experince working with the camera application, retreiving photos from your gallery, working with Bitmaps, and more.
It is worth noting some of the struggles I had while creating this application. It seems that since Android phones are made by many manufacturers, the way the images were presented in the app when taking a picture or selecting an image was not consistent. On some phones, taking a picture in portrait orientation caused the image to rotate 90 degrees, while it did not on others. There has also not been consistency on the image quality of taken pictures between different phones. When testing my application on a real device (Samsung Galaxy S21+), this was not a problem, but in the future I would like to come back to this project and find a way to make it consistent across all devices. Regardless, the app properly uses a TensorFlow Lite model to classify food dishes on any of these devices, accomplishing my main goal of learning more about the TensorFlow Lite Android Support Library and incorporating it into a realistic app.
There are so many interesting things you can do with the TensorFlow Lite Android Support Library beyond what was done in this project. One of these things is that you can create and train your own model to use in an application. More information on how to do so can be found at this link. There are so many different things you can do with machine learning involving various things besides images such as audio, text, videos, and more. It is also worth noting that Google has their own mobile SDK that can be used on IOS and Android apps named ML Kit. It would be very interesting to see a similar project created but instead using Google’s ML Kit. More information on ML Kit can be found at this link.
Overall, this project was a great learning experience and allowed me to become more familiar developing native Android applications, while also introducing me to the world of machine learning. I will definitely be interested in gaining more experience regarding this topic, especially when it comes to using TensorFlow.
A link to the Github repository holding the code for the project can be found here.